 I want to improve my finger cymbals or zill playing. This has been on my mind especially since I started performing with Navid. To improve my technique, I must practice playing finger cymbals, of course. But the problem with practicing finger cymbals is that they are LOUD. Yes, they are small, but they are cymbals. They are so loud that I’m sure my neighbours and landlord can get annoyed by my poor playing, and my ears start to ring. Yet when I try to practice quietly, the finger cymbals just wobble on my fingers, and I can’t “feel” it.
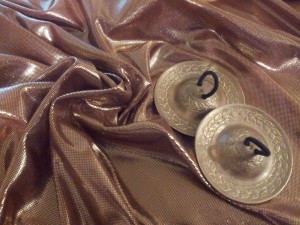
So I thought I should put covers on these little cymbals. This idea came to me when Navid and I were travelling. I picked up 2 pairs of finger cymbals in Turkey, so happy with the thought that I could keep practicing throughout our 8-month travelling, only to realize that I could not play them in cheap hostels that we were staying in or even on the beaches, because they are so annoyingly loud. They attract too much unwanted attention.
Then one day in Vietnam, I was thinking that I desperately needed hair cut and colouring, and I thought about those disposable ear covers that hair stylists put on your ears when you dye your hair, like these. Maybe those ear covers would fit my finger cymbals and lessen the sound volume? We found some of those ear covers being sold with shower caps, so I quickly purchased them and tried them on my finger cymbals.
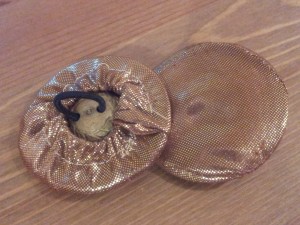
The result was not bad! They did muffle the sound quite a bit, and although they fell off my finger cymbals easily, they did the job for the rest of our trip. By the end of the trip, however, the plastic covers were torn and ripped in all direction, and I needed replacement. I needed more durable finger cymbal covers.
I recently made these covers with fabric. It worked out very well, and so I want to share with you how I made them.
Time required:
about 15 minutes per cover
You’ll need:
-
Thin and stretchy fabric – About 35 x 30cm (14 x 12 inches) for finger cymbals with 6cm in diameter. I used this thin and stretchy gold fabric I had from my previous projects. It should be thin, or you won’t be able to hear anything when you put the covers on your finger cymbals. You can test this by holding a finger cymbal with one hand, place the fabric right on the finger cymbal, and try hitting with another finger cymbal. You can hear how much the sound is muffled with a layer of the fabric. If still too loud, fold the fabric so that you have 2 layers of the fabric then test. If 1 layer is enough, all you need to make it 1 cover per pair of finger cymbals. It’s best if it is stretchy 2 ways or 4 ways, so the covers will fit your cymbals nice and snug.
-
Thread – matching or different colour…whatever you like!
-
Elastic – 3mm wide. 1m long is plenty.
-
Scotch tape – 2cm
1. Draw a pattern on fabric
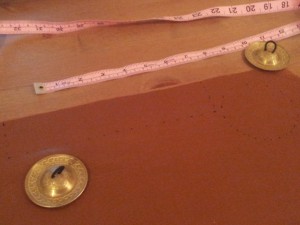
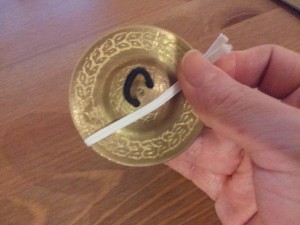
For 1 finger cymbal, you need 1 circle piece and 1 rectangular piece. First trace the finger cymbal on the fabric with a marker. Then draw a bigger circle around the circle you just drew by adding 1cm for sewing.
Then draw a rectangle. The height of the rectagle is 4.5cm. For length, we need to do a little math:
(Diameter of the finger cymbal) x 3.14 + 2cm = length
Since the diameter of my finger cymbal is 6cm, the length of the rectangle was
6cm x 3.14 + 2 = 20.84cm.
2. Cut the pattern
3. Sew the rectangle piece
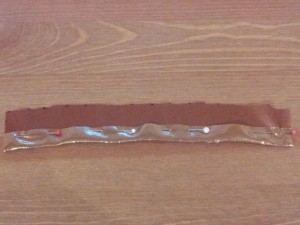
First, take the rectangle piece and place it in front of you with the right side (the side of the fabric you want to be outside) down. Fold the long side over about 1cm, then sew a few millimeters from the cut edge. This is where you put a piece of elastic through.
4. Combine the rectangle and circle pieces
To do this, first cut small slits (about 1cm) from the side of the rectangle piece that is not sewn, like this.
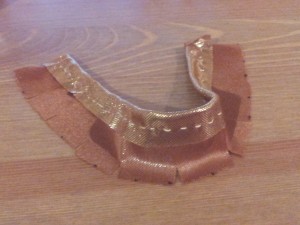
Then place the rectangle piece along the circle you traced on the circle piece like this.
And just sew along the circle. Flip it over, and it should look like this.
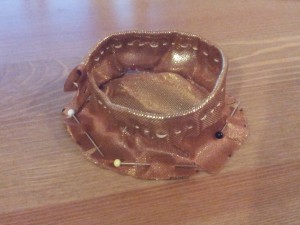
5. Put elastic through
First, measure how much elastic you need by holding the end of elastic and stretching it over the longest part of your finger cymbal. Give about 1cm unstretched on both ends for tying.
Then put the elastic piece through the hoop that you sewed at the beginning. I usually put a safety pin at the end, so I don’t lose the end. Also, I put a small piece of scotch tape like this, which gives you something to hold onto when you slide the elastic through the hoop.
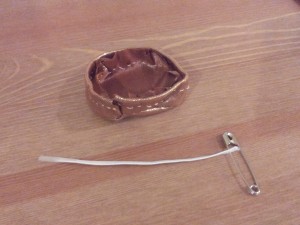
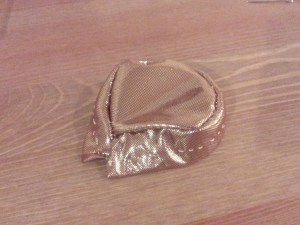
Once the elastic has gone through, tie the end, and voila! Just repeat the process to make more.
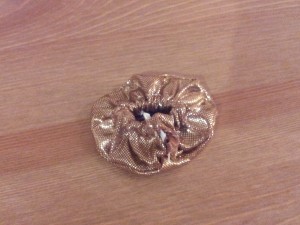
6. Put the covers on your finger cymbals, and play away as much as you want!
Now I need a name for these things. Finger cymbals covers sound a bit awkward. I like what my instructor suggested, “Zill Bumpers.” Any other suggestions?
Did you enjoy this article? Get our latest articles in your email inbox!
[mc4wp-form]